01Introduction
Have you ever wondered how to track, say, a celebrity or a politician in a real-time video? This is the case of tracking an object in motion in real-time. So far, in the first part of this tutorial, you learned how to detect objects of 80 different types using YOLO. The object detection was performed in a still image, a pre-recorded video and a live web stream. In the second part of the tutorial, you learned to segment the detected objects using Pixellib and mrcnn libraries. In this tutorial, you will learn to use another framework called DeepSORT for tracking a specific object in real-time. It means that if there are a group of people moving around in an open space or a garden, you will identify each person individually and track her motion until she leaves the garden (goes beyond the camera’s range.)
02What is DeepSORT?
DeepSORT is a popular object tracking framework for tracking objects in real time based on the research paper by Nicolai Wojke, Alex Bewley and Dietrich Paulus[1]. It is an extension of the SORT (Simple Real Time Tracker). The principle on which it works is called Similarity Measure.
It records the distribution of features of a detected object in the current video frame. In the next frame, a Mean Shift looks for the new largest mode of distribution of these features. Thus, it is available to track the same object in the next video frame. It can also compute the relative velocity of the object using this technique. Note that if there are two objects, say two different persons in the current frame, the features distribution for these two persons will be different and distinct. Thus, it is possible to track each person individually. The key component of DeepSORT is the Kalman Filter[2], which helps to keep record of the positions and velocity of the object. It also helps in deleting the objects that were tracked a long time back, i.e. it assumes that the object has left the frame. I will now explain the cosine similarity.
03What is Cosine Similarity?
Cosine similarity is a method to measure the difference between two non-zero vectors of an inner product space. We measure it by the cosine of the angle between two vectors and determine whether two vectors are pointing in roughly the same direction. We can find the applications of this in recommender systems, context similarity in text analysis, and so on.
In DeepSORT, the vectors here represent the features or appearance measures/descriptors of a particular object, and the product space means the feature space. After the objects are detected using the neural network created with YOLO, we take all the information about the detected object from the output layer of the network, i.e. the features of the objects, and pass them into the NearestNeighbor[3] algorithm using the cosine as metric, to know whether two detected objects are same or similar. For example, suppose if a detected person is at some position near the webcam, in the next frame he shifts his position somewhere else. Then we will get the cosine angle between the features of the two detected objects as zero or very close to zero, i.e. the two detected persons are the same, even if his/her position has changed. If the two detected objects are completely dissimilar, then the cosine angle between them would be 90° or close to 90°.
This is how DeepSORT tracker uses NearestNeighbor with cosine similarity to classify whether an object is the same or different.
04Preparing Project
You will need to download the following files to your machine using the provided links. You had previously downloaded the COCO dataset and Yolo configuration files in the previous two parts of this tutorial series.
- COCO dataset names -(coco.names)
- Pre-trained model - (market1501.pb)
- Yolo Configuration weights and cfg file for 320x320 images - (Check Part1 for reference)
- Deep Sort files from nwojke’s repository. You only require to download the three folders namely - ‘application_util’, ‘deep_sort’, ‘tools’. Put all the files in the ‘deep_sort’ folder for easier access.
- Download the project source from our repository
After downloading the files, rearrange all files in your project folder, as shown in the tree-structure below:
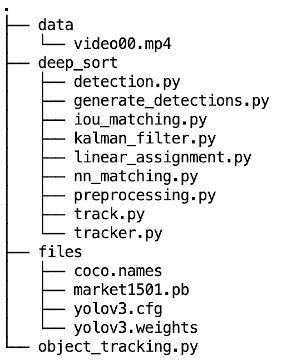
You may optionally delete the rest of the downloaded files.
Now, as you have set up your project folder, let us start with the implementation. Open a new Python file called object_tracking.py and add the following imports.
import numpy as np
import cv205Getting the classnames
We will use the classnames used in the COCO Dataset. There are 80 distinct classes. Keep in mind that we will require this list throughout the tutorial, since we will use pre-trained models based on the COCO dataset. To know more about how to use this dataset, refer to the part I.
Store these classnames in a Python list.
classnames = []

with open('files/coco.names') as f:
    classnames = f.read().rstrip('
').split('
')06Importing DeepSORT
Next import the deepsort packages
import deep_sort.preprocessing
from deep_sort.nn_matching import NearestNeighborDistanceMetric
from deep_sort.detection import Detection
from deep_sort.tracker import Tracker
import deep_sort.generate_detections as gdet07Object Detection Using YOLO v3
First, we set up the DNN based on a pre-trained model.
08Setting Up DNN
We set up the DNN using OpenCV functionality with the downloaded configuration file and pre-trained weights.
nnet = cv2.dnn.readNetFromDarknet('files/yolov3.cfg', 'files/yolov3.weights')
nnet.setPreferableBackend(cv2.dnn.DNN_BACKEND_OPENCV)
nnet.setPreferableTarget(cv2.dnn.DNN_TARGET_CPU)09Utility Functions
Here are the definitions of a few utility functions. These functions are fully explained in the part I of this tutorial series
10Bounding Boxes
The findObjects function gets the bounding boxes along with the class name and the confidence value of a detected object.
def findObjects(outputs, img):
    conf_thresh = 0.8
    nms_thresh = 0.3

    h_tar, w_tar, channels_tar = img.shape
    bbox = []
    classIds = []
    confs = []

    for output in outputs:
        for d in output:
            scores = d[5:]
            classId = np.argmax(scores)
            confidence = scores[classId]
            if confidence > conf_thresh:
                w,h = int(d[2]*w_tar), int(d[3]*h_tar)
                x,y = (int(d[0]*w_tar) - w/2), (int(d[1]*h_tar) - h/2)
                bbox.append([x,y,w,h])
                classIds.append(classId)
                confs.append(float(confidence))

    indices = cv2.dnn.NMSBoxes(bbox,confs,conf_thresh,nms_thresh)

    nms_bbox = []
    nms_confs = []
    nms_classIds = []

    for i in indices:
        i = i[0]
        nms_bbox.append(bbox[i])
        nms_confs.append(confs[i])
        nms_classIds.append(classIds[i])

return nms_bbox, nms_classIds, nms_confs11Detecting Objects
The detect function detects the objects in the specified image.
def detect(nnet,img):
    w_h_tar = 320  # since using yolo v3 320x320

    blob_img = cv2.dnn.blobFromImage(img,1/255,(w_h_tar,w_h_tar),[0,0,0],1,crop=False)
    nnet.setInput(blob_img)

    layerNames = nnet.getLayerNames()

    outputNames = [layerNames[i[0]-1] for i in nnet.getUnconnectedOutLayers()]

    outputs = nnet.forward(outputNames)

return findObjects(outputs, img)12Generating Random Colors
The following code is used for creating random color values for the bounding boxes.
colors = np.random.randint(0, 255, size=(200, 3), dtype="uint8")Next, we proceed to setup DeepSORT
13DeepSORT Tracker
To set up the DeepSORT tracker, follow the steps below:
14Setup Encoder
We will need an encoder for generating features from an image. This encoder is a pre-trained model provided in the gdet module. Initialize it using the following code:
model_filename = 'files/market1501.pb'
encoder = gdet.create_box_encoder(model_filename,batch_size=1)15Setting Up Metric
We will generate a metric for calculating the distance similarity between moving objects in a video. We will use cosine similarity metric for this purpose, with a desired value for cosine distance.
max_cosine_distance = 0.5
nn_budget = None

metric = NearestNeighborDistanceMetric("cosine", max_cosine_distance, nn_budget)
For further understanding on how Nearest Neighbors work with cosine similarity, refer Cosine Similarity & Nearest Neighbors[3] document.
16Initializing DeepSORT Tracker
Finally, initialise the DeepSORT tracker by passing the above metric.
tracker = Tracker(metric)Then, we write code for object tracking.
17Detecting and Tracking Objects
The following code allows the user to select between a pre-recorded video or a live webcam.
inp = int(input('Choose the format for detecting objects :
 1.Video
 2.Webcam
'))

if inp == 1: #for video
    cap = cv2.VideoCapture('data/video00.mp4')
elif inp == 2: #for Webcam
    cap = cv2.VideoCapture(0)


while True:
    success, img = cap.read()
Detect objects in the captured frame by calling the detect method.
boxes, class_ids, scores = detect(nnet,img)The function returns the bounding boxes, class ids and confidence values which are stored in three respective lists.
We get the class names for the above class_ids using following code:
names=[]
    for i in class_ids:
      names.append(classnames[i])
Next, we will generate the features of the detected objects and create a list called detections where each item contains a Detection object having values of the bounding box, confidence value and features of a detected object.
    features = np.array(encoder(img,boxes))
    detections = [Detection(bbox, score, feature) for bbox, score, feature in zip(boxes, scores, features)]
We call the predict function from our DeepSORT tracker and update our tracker with the detection list for the current frame. The predict function checks if the object was present in the earlier frame.
    tracker.predict()
    tracker.update(detections)
Next, we iterate over each detected object and get the tracking id for the object and store it in the list indexIDs. Also, we get the coordinates of the object’s bounding box and generate a color for it.
# i is required to generate different colors for the bounding box of different objects
    i = int(0)

    indexIDs = []

    for track in tracker.tracks:
      if not track.is_confirmed() or track.time_since_update > 1:
          continue

      #tracking ID
      indexIDs.append(int(track.track_id))

      #bounding box
      bbox = track.to_tlbr()

      #generating a color
      color = [int(c) for c in colors[indexIDs[i] % len(colors)]]
Finally, we draw the bounding box and write the classname over the object.
      if len(names) > 0:
        cv2.rectangle(img, (int(bbox[0]), int(bbox[1])), (int(bbox[2]), int(bbox[3])),(color), 3)
        cv2.putText(img,names[0].title()+" "+str(track.track_id),(int(bbox[0]), int(bbox[1] -50)),0, 5e-3 * 150, (color),2)

      i += 1
We show the frame on screen and wait for the user to terminate the loop:
    cv2.imshow('Vid',img)

    if cv2.waitKey(1) & 0xFF == ord("q"):
        cv2.destroyAllWindows()
break18Modifications for TF2.0 and Scikit-learn
In the deep_sort folder find the file called generate_detections.py, and open it in a text editor.
19Edits in “generate_detections.py”
Before Changes:
import cv2
import tensorflow as tf

def _run_in_batches(f, data_dict, out, batch_size):
    data_len = len(out)
    num_batches = int(data_len / batch_size)
After Changes:
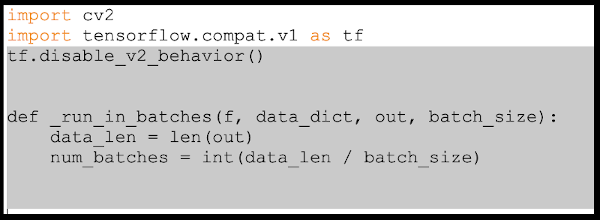
Note that since the library was built using TF1.5, we have added code to disable the TF2 code behaviour/syntax.
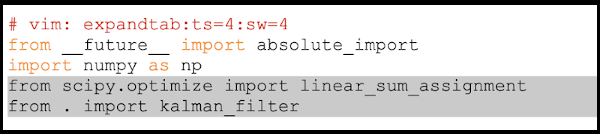
20Edits in “linear_assignment.py”
Before Changes:
# vim: expandtab:ts=4:sw=4
from __future__ import absolute_import
import numpy as np
from sklearn.utils.linear_assignment_ import linear_assignment
from . import kalman_filter
After Changes:
After line 58 :
Before Changes:
cost_matrix = distance_metric(
        tracks, detections, track_indices, detection_indices)
    cost_matrix[cost_matrix > max_distance] = max_distance + 1e-5
    indices = linear_assignment(cost_matrix)

    matches, unmatched_tracks, unmatched_detections = [], [], []
After Changes:
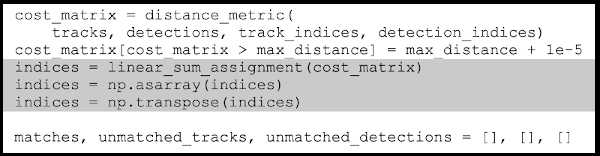
Done! Now you should be able to run this project with Tensorflow 2.x and Scikit-learn versions 0.23+.
21Summary
In this tutorial you learned to use the new library called DeepSORT for detecting and tracking objects in real-time. You used YOLO v3 for object detection. After an object is detected, you obtained its features using a pre-trained model. You then learned how to set the metric for the DeepSORT tracker and subsequently use it to initialize the tracker. Ultimately, we saw how to put these all together and track the detected objects by drawing the classnames and tracking id over each object.
That’s all for this tutorial. Hope you learnt something new from this tutorial. Try implementing it by yourself. Goodbye!

Arka Dyuti Kundu
Project idea, development and technical writing.
6 articles on ABCOM Education